|
|
| |
| Description |
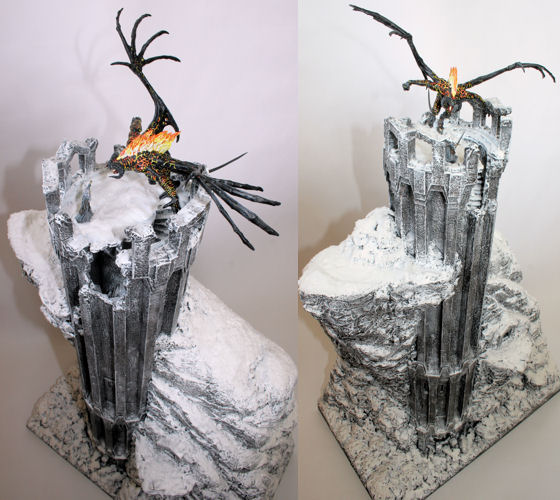
A diorama based on the epic Battle of the
Peak shown in The Two Towers |
| Author |
Dorthonion |
Date
|
Mon Apr 13, 2009 12:29
am
|
|
|
| Category |
Dioramas |
| Type |
Project |
Complexity
|
Advanced
|
| Viewer Comments
[26 - Post your comments] | |
 |
|
| Building Balrog's Doom |
| A diorama based on the
epic Battle of the Peak shown in The Two Towers |
 |
Materials Used
Mailing Tube 625mm x 52.5mm
Knauf Polyfoam 1
sheet 1200 x 500 x 52.5mm
5mm foamcore (foamboard)
2 sheets of 508 x 762mm.
Balsa 12.5mm square
section
Balsa 18 x 8mm section
Polyfilla
standard variety
Polyfilla Fine Crack variety
Evostik general purpose adhesive
PVA glue
ScatterGrip glue
Deluxe Scenic Snow
Deluxe
Scenic Bond
Green stuff
Polystyrene glue
Super Glue or Epoxy Resin (Araldite)
Cardboard
(a variety of thicknesses)
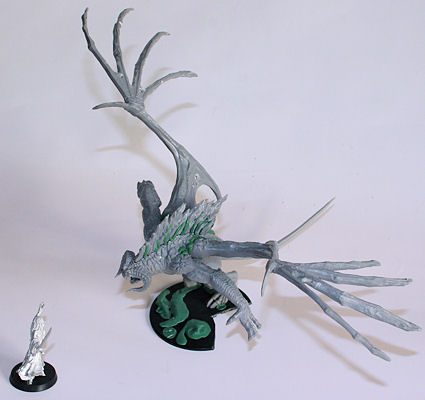
Plastic Balrog kit
Khazad-dum Gandalf (metal)
|
|
Tools Used
Hobby
knives (with a selection of blades)
Hacksaw with
fine blade
Victorinox fruit knife (for cutting and
carving the foam)
A range of paintbrushes
Needle
files
Pin Vice
Side cutters
Rulers
Protractor
Ruler
Set square
Tape measure
Drawing Compass and pencils
Pencils, pens and
markers
A3 paper (only for drawing plans)
Ruler
|
|
Paints Used
DecoArt
Black
White
Burnt Umber
Tan
Games Workshop
Chaos Black
Skull White
Scorched Brown
Bad Moon Yellow (old colour)
Sunburst Yellow
Gore Red
Blood Red
Fortress Grey
Codex
Grey
Space Wolf Grey
Mithril Silver
Boltgun
Metal
Tanned Flesh
Dwarf Flesh
Elf Flesh
Snakebite Leather
| |
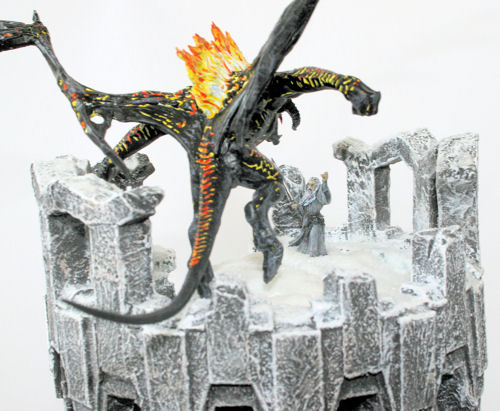
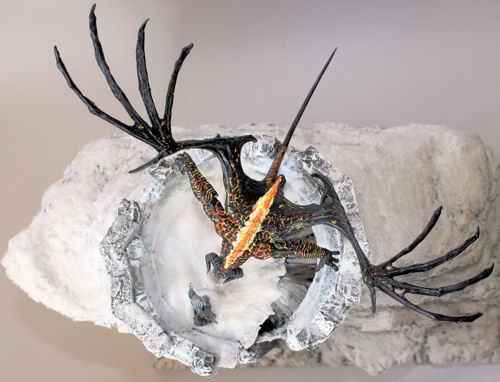
The
battle between Gandalf and Durins Bane is shown in both The
Fellowship of the Ring and The Two Towers, in two distinct phases:
the Bridge of Khazad-dum, with the stupendous extended version
showing Gandalf striking the Balrog even as they plunge into the
abyss, and later in TTT, the Battle of the Peak, at the summit of
the mountain called Celebdil, the Silvertine, known to Durins folk
as Zirakzigil, where stands Durins Tower at the top of the Endless
Stair.
There have been fantastic miniature renditions of the
fight at Durins Bridge, and several tremendous versions of the
terrifying plunge to the abyss, capturing the atmosphere and
grandeur of the opponents and the settings. I have seen numerous
dioramas of Zirakzigil, with beautifully painted and converted minis
but unfortunately, the terrain tends to be rather stumpy, without
the geometric dwarfish architecture and lacking the precipitous,
bitter and hard frozen aspect of the film version. The setting is an
essential part of the atmosphere and I was motivated to try my hand
at a more faithful rendition, both of the setting and of the wounded
balrog. It was also an opportunity for me to try out new materials
and also make my first ever attempt at creating a snow clad
environment.
All
constructions start with research. I gathered images of the Battle
of The Peak from framecaplib, from the TTT EE DVD, and from the
Making of books. Unfortunately, there are no unambiguously clear,
large scale images of the entire bigature, so I had to work from
many smaller pictures to get an idea of how the mountain was shaped
and where the tower fitted into that.
Durins Tower seems to
grow from within the mountain, reminding me of what Michelangelo
said about his sculptures:
| Quote: |
| The best artist has that thought alone which
is contained within the marble shell; The sculptor's hand can
only break the spell to free the figures slumbering in the
stone |
I
imagine the dwarves, supreme masters of stone masonry, would have
agreed with him (and not just because he too had a big beard and was
renowned for being filthy and cantankerous).
The
tower is tall and slender for its size, and there is visible damage
to the sidewalls near the base and just below the crown of angular
windows. Many of these windows are destroyed, presumably during the
fight, though some are standing even at the very end. The tower is
not round, having a basic 12-sided plan form but with some vertical
sections rotated longitudinally 15 degrees relative to one another
to make the interfaces of buttresses and arches flow around one
another. The windows on the top continue this vertical, angular
flowing theme. I kept images and sketches from this research
available while working on the project.
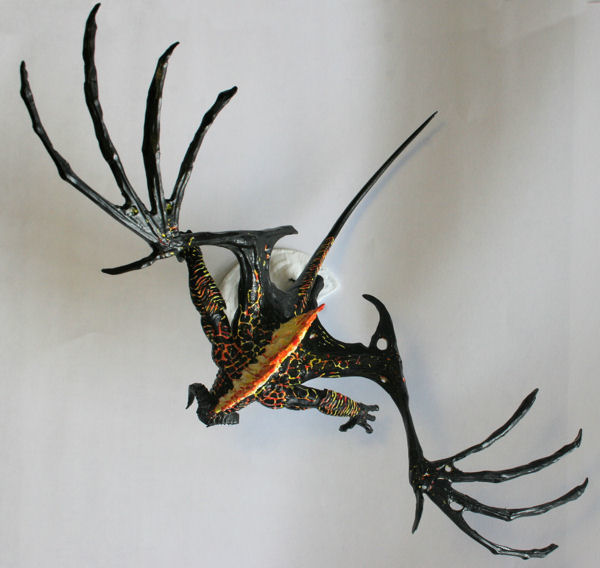
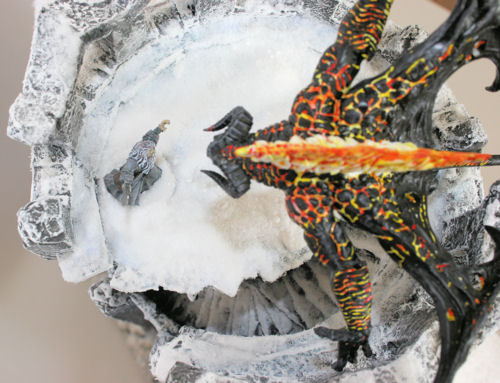
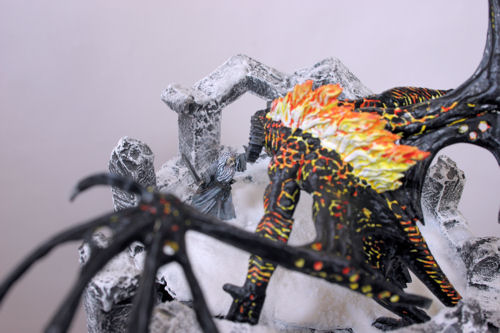
Something else
became very apparent about the Balrog when watching the Battle of
the Peak; the membranes of both wings are gone, and the balrogs
left wing pinions are trailing, broken in places and are drooping
down across the shattered upper steps of the Endless Stair. The
Balrog is vast, the tail and wings protruding well beyond the
circumference of Durins Tower during the fight. The skeletal nature
of the battered wings is even more obvious when you watch the
balrogs death plunge off the tower on to the snow-covered rocks
hundreds of feet below.
Before
building anything, you need to think about where you can store or
display it, even during the build phase. After looking around and
making measurements, I decided that the best compromise between the
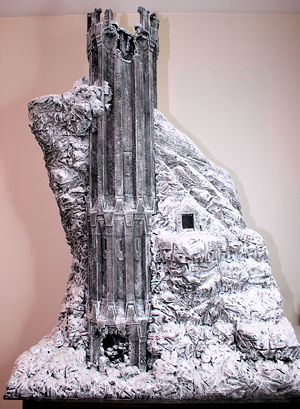
grandeur of the scene and the necessities of life was to build the
tower approximately 70cm tall; allowing 5cm or thereabouts for the
height of the windows, top floor level is at 65cm, then add 15cm for
the height of the Balrog giving 80cm overall. The balrogs wingspan
is around 25cm so the tower had to be smaller than this in diameter.
I settled on 14cm (15cm at the top), which is a bit tight but gives
a 5:1 ratio of height to girth so the tower appears relatively
slender and will give the proper vertiginous aspect when
photographed from above.
There had to be enough of the
mountain around the tower to capture the essence of the shape and
show some recognisable features such as the ledge Gandalf lies on
after vanquishing his foe. Yet again, I had to work out a compromise
on how much storage/display space was available, and came up with a
length of 50cm and width of 30cm for the base.
I prefer modelling
materials to be lightweight but strong. I selected the Knauf
Polyfoam for the rockwork as it fulfils both conditions and is
workable using simple tools. The pieces are 1200mm x 500mm x 52.5mm,
come in a packet of 4 costing £20-30 depending on where you look
(and when!) I wanted to use just one piece for the sake of economy
(and weight), and knew that the centre would be mostly hollow, so
clever arrangement of layers of foam would build up the rock around
the tower.
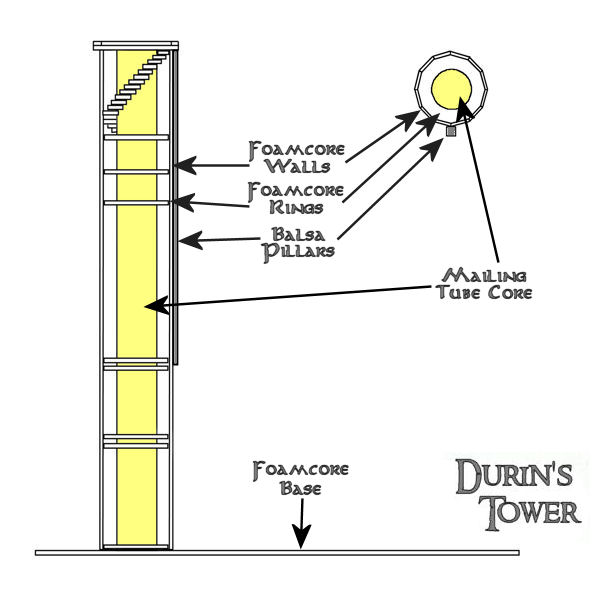
I needed something to use for the core of the
tower and this delayed implementation for months while I searched
for something tubular, light, strong and affordable, of around
10-12cm diameter. Mailing tubes are widely available, and it dawned
on me that I only needed the length to be good as I could create the
greater radius using the foamcore. The standard tube I used is
62.5cm long, 52.5mm diameter and has plastic caps at each end.
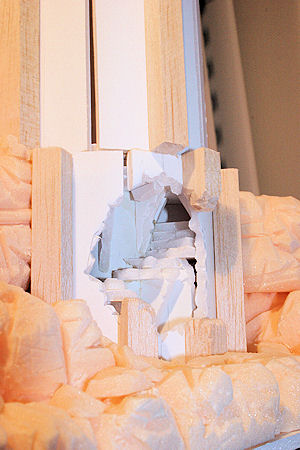
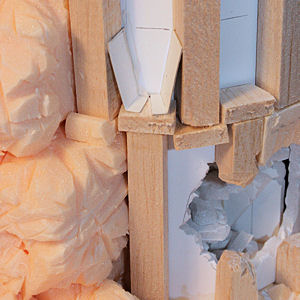
The pillars that make up the ribbed exterior of the tower
and the windows at the top would be made from balsa, again, very
light and easy to work, as well as being affordable.
There
are other materials available, but I ruled these out on grounds of
weight, availability, cost, my inexperience in using them, and for
being potentially very messy and time-consuming.
There are 3 versions
of the Balrog available 2 metal and one plastic. The thought of
putting a metal Balrog up high does not appeal to me so I opted for
the plastic version. The wings are all the same in any case, so the
alterations to those would be unaffected.
There was only
really one possible Gandalf for this scene, and that is the version
from Khazad-dum, without his hat or cloak. The only alteration
required was the complete removal of his staff. There are actually 2
minis of Gandalf to consider -
http://uk.games-workshop.com/storefront/store.uk?do=Individual&code=99111499052&orignav=16
http://uk.games-workshop.com/storefront/store.uk?do=Individual&code=99061464015&orignav=16
I prefer the version from the Breaking of the Fellowship.
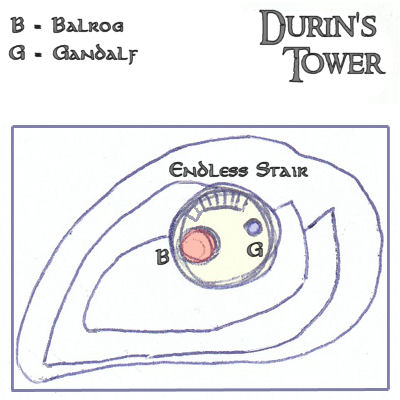
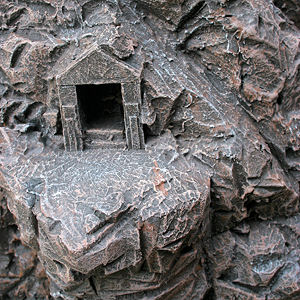
It all begins with a
floor plan. The crown of the tower is where the final duel takes
place, so there has to be enough room for Gandalf and the Balrog. I
found some good images of this part of the tower in the extras on
the Two Towers DVD. There are stairs opening on to the summit
platform and the damage to most of the arches around the
circumference of the platform. There is enormous damage to the
structure immediately below the top, and also at the visible base of
the tower. I made some very rough sketches of these, and after some
experimentation came up with the tower plan below.
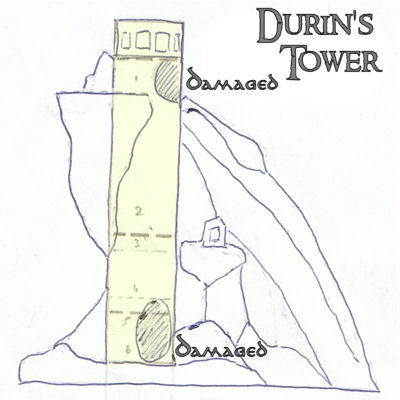
The
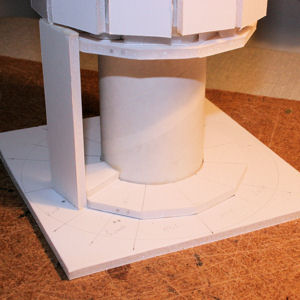
two diagrams below indicate how the tower fits into the mountain.
The base of the structure is a piece of 5mm foamcore, cut to 500mm x
300mm. The mailing tube and the polyfoam are attached to this, with
successive layers of polyfoam added to make the basic shape of the
mountain. To work out where rock ends and tower begins, you need to
build the core of the tower first and work outward and upward from
that.
Note
keep all the foamcore off cuts; as you will see later, they can be
really useful.
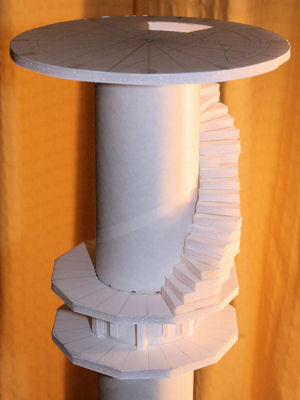
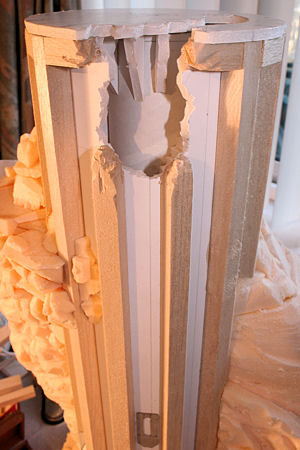
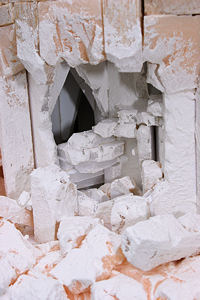
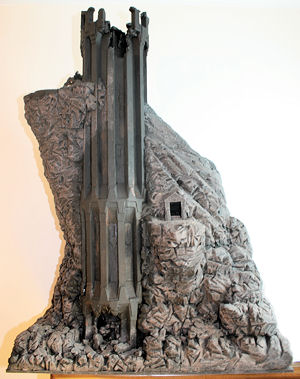
| Step 2: Creating
the Core of Durins
Tower |
The central support
for the tower is created from the mailing tube. The next picture
gives some idea of the amount of work required to build the piece,
especially as I wanted it to be viewable from all sides (and above!)
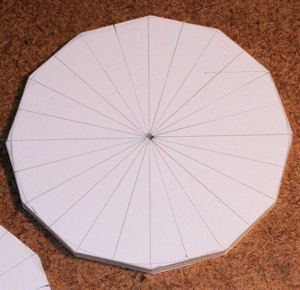
The
outer diameter of the tower is 150mm measured to the window
buttresses. Since the tower is a 12-sided polygonal cylinder, I
created foamcore rings that would fit around the mailing tube. Use a
drawing compass to draw a 100mm circle on foamcore; draw a 52.5mm
circle within the first one. Use a protractor to mark lines
radiating from the centre every 15 degrees (24 lines altogether).
Draw tangents to the outer circle on alternating radial lines this
will create a 12-sided polygon. This is the overall shape you want
to cut out (see next image below), though you will need to cut out
the inner 52.5mm ring very carefully as this has to fit snugly on to
the mailing tube..
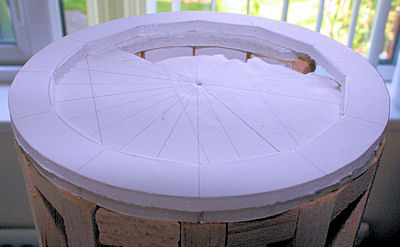
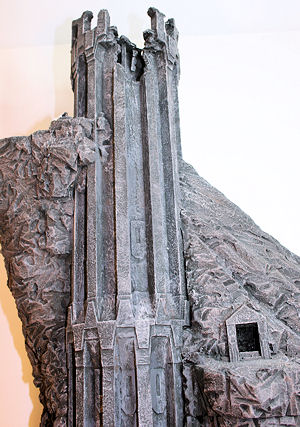
Since
the orientation on the ribs of the exterior of the tower (and the
arches at the top) varies with height, sufficient rings are made
from foamcore to permit attachment of the foamcore and balsa
exterior you need at least 2 rings for each section; I used 7 in
total.. Shattered stairs, part of the legendary Endless Stair, are
visible running around the core, so I wanted to include these for
two reasons accuracy, and they also add strength to the walls. The
next diagram shows the basic construction plan for the tower.
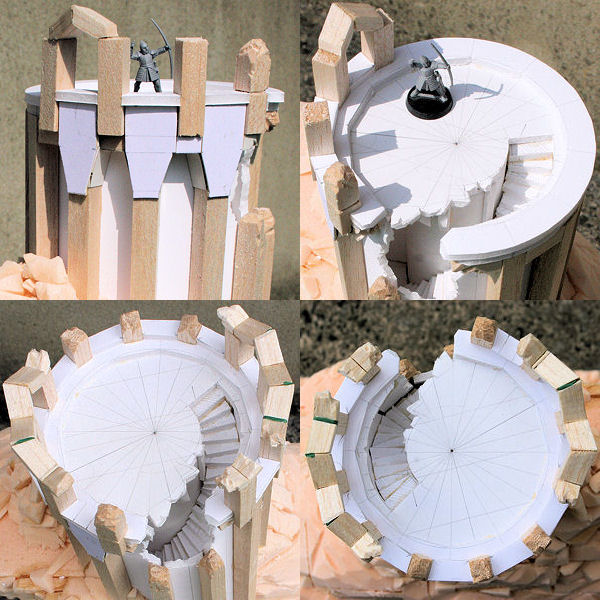
The
top section of the tower has the longest vertical walls and the top
of the Endless Stair, so I used 3 of the rings to create the radial
support. Note the use of scraps of foamcore to help secure the
rings. The Endless Stair was built upwards, and the larger ring at
the top (a 140mm circle) was not attached until the last step before
this platform level was glued in place. I had marked guidelines for
the placement of window pillars and other features on this disc it
makes final assembly much easier.
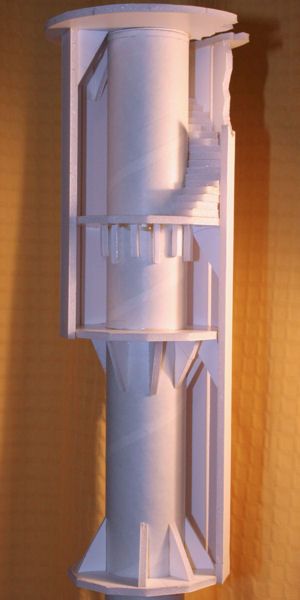
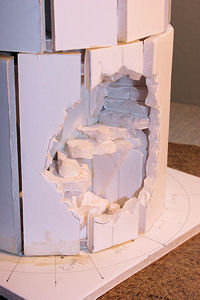
There
is no need to make all the walls of Durins Tower, only those parts
that are going to be visible. I cut strips of foamcore 25mm across
to make the walls. There are small gaps between these walls; the
balsa pillars will be attached in line with these gaps. Note the
damaged part of the top platform and the foamcore off cuts used for
bracing.
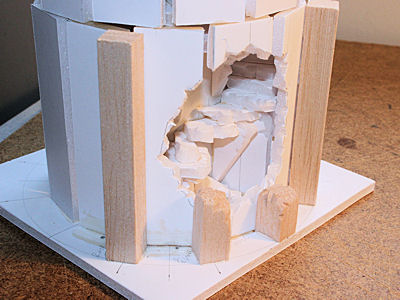
The
long wall sections are for the exposed part of the tower; the
shorter sections are for the part embedded in the peak. Note the
gaps between sections. I pencilled in markings to help gauge where I
needed complete coverage, and where damaged sections were needed (it
is easier to create damage before attaching components). You need to
keep track of the orientation of the tower.
The
base of the tower was glued to a square of foamcore which was later
attached to the base component. The base was also marked out with
accurate guidelines.
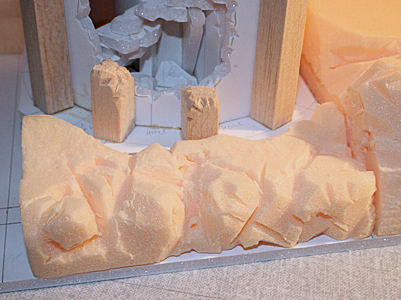
More
shattered stairs were added at base level as these would be visible
through the hole in the side of the tower at that level. The wall
sections were also distressed as well as cutting out the hole,
before attaching these to the tower.
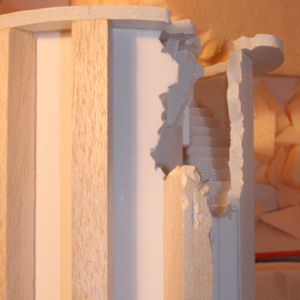
The
basic shape of the hole in the base of the tower is apparent in the
next image; Note how the wall sections for the next section above
the base are orientated 15 degrees off the alignment of the base, so
the gaps in that next section line up with the middle of the base
section walls. This is the first sign of the dwarven geometric
styling.
Note:
I allowed plenty of time for the glue to set firmly on all that
foamcore, putting a couple of pieces in place and allowing an hour
before attaching the nest couple, and added as much bracing as
possible to make it stronger.
| Step 3: Creating
the ribbed exterior of Durins
Tower |
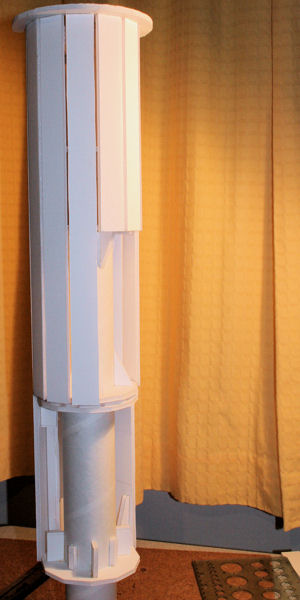
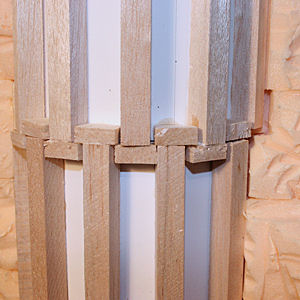
With all the exposed
walls in place, I started adding the ribbing, working up from the
base of the tower. Two ribs have been blasted at the base of the
tower as shown below. These are 12.5mm square section balsa. I cut
this using a fine hacksaw blade as it leaves a very neat cut. The
damaged rib sections are simply very short pieces with the ends
carved to look like they have been blasted asunder.
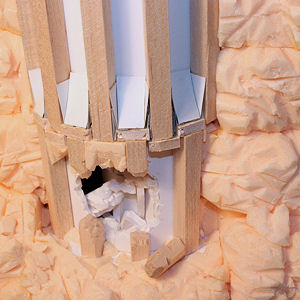
The
same basic idea is used for all the ribbing over the entire height
of the tower. Allow plenty of time for the glue to set firmly on
these ribs. The ribs are centred with the small gaps in the walls. I
found that laying the entire terrain piece sideways, with the most
recently added rib on top, was a good way of ensuring that it stayed
in place while the glue set. There are 12 evenly spaced ribs visible
at the top of the tower, and then 4 or 5 visible on the flank where
the tower seems to erupt from the mountain. More work on these ribs
follows later, but the mountain has to be wrapped around the tower
first.
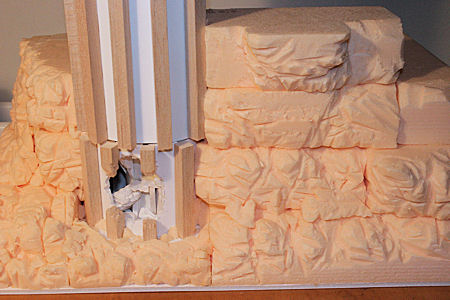
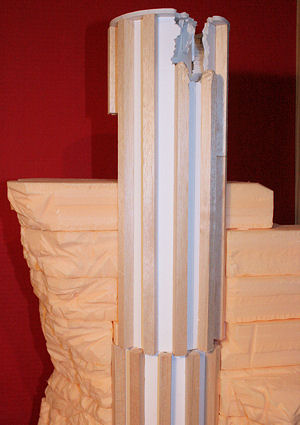
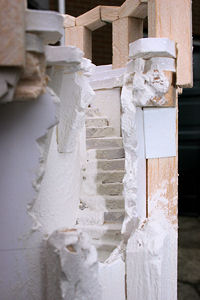
| Step 4: Creating
the Mountainside |
The large
sheet of polyfoam was cut into rectangular sections, mostly about
70mm across, some as narrow as 40mm and of various lengths. These
were dry-fitted first, and in some cases, some of the basic carving
of the outer rock surface was done before gluing the section in
place. Keep all the off cuts they are used later in the
construction.
Layers
of rock were glued and left to set firmly for 8 hours or more. Dry
fitting was repeated for each successive layer in order to get the
rock face fitted tightly around the tower.
Spare
pieces of polyfoam are used below to help disguise the horizontal
line where the layers are joined.
The
mountain features a significant overhang; the upper pieces of
polyfoam were dry fitted and part carved to ensure that the correct
profile was being created.
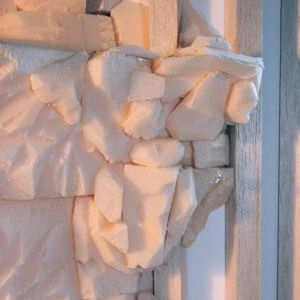
There
is a messy rock outcrop, not a ledge as such, but mimicking how ivy
or other creepers spread over available surfaces. Obviously the
dwarves had not gotten round to carving this away (maybe there was
an underlying flaw in the stone). I built this entirely from off
cuts from other parts of the mountain.
The
top of the mountain also used some of the scraps; these form the
outcrops that partly encase three quarters of the tower (basically
the left, top and right as seen in the next image below).
The
carving of the rock was done with the fruit knife and several hobby
knives. I had already marked prominent features on the polyfoam as
guides for cutting (this can be done while dry fitting pieces of
polyfoam). Detailing can be carried out for as long as necessary,
making smaller and finer cuts to add to the level of visual
complexity. I used many small pieces of polyfoam to help disguise
the horizontal and vertical joins between the large pieces of
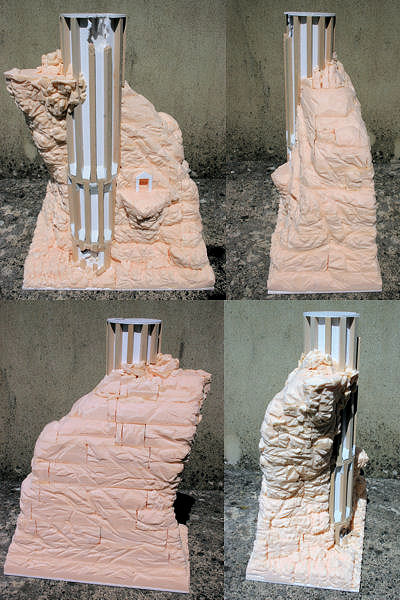
polyfoam forming the bulk of the mountain. The following 4-way
work-in-progress view gives some idea of the amount of work
involved.
| Step 5: Completing
the Exterior of Durins
Tower |
The visible portion of
the ribbing was glued in place for the entire height of the tower.
The outer edge of the ribs matches the outside circumference of the
platform that forms the roof of the Endless Stair (140mm) and the
floor upon which Gandalf and Durins Bane do battle. PVA glue is
used for all the work below.
Short
sections of 20x12.5 section balsa are added to the intersections of
the three main sections of the tower. This adds more support and
strength when creating the geometric overlapping pattern of the
interchange.
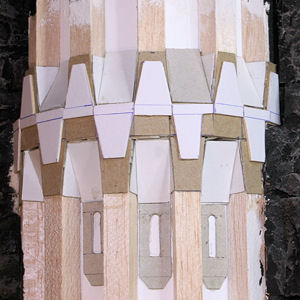
I
used card to taper the gaps between the pillars. The taper starts
25mm from the flat section. The taper is repeated at the top and
bottom of every gap in the ribbed exterior of the tower.
The
next stage is to create a transition from the inner wall of the
tower to the ribs; another section of card is cut slightly wider
than the gap and 45mm long. Use a fine ball point pen to mark a line
across the strip 12mm from one end and fold it along that line. Trim
the edges of the strip to fit the gap (there are inevitable small
variations from one gap to the next so it becomes a case of repeated
dry fitting and adjustment), then glue the short part to the
horizontal support, and the long section goes into the gap. Examples
of this are shown below.
The
mid-tower transition is the most visible and complex but it is made
in exactly the same way, though there are tapers oriented both
upward and downward. I found that the assembled piece was light and
strong enough to place upside down to work more easily on the
downward oriented tapers. The mid and lower transition tapers are
seen in the next image.
Another
layer of card is added in sections matching the tapers, and one
further layer of card is added along the same general lines to
create something reminiscent of the pattern on the columns in the
halls of Moria. Thinner or thicker card could be used to make this
decoration more or less prominent. There are a few windows on the
tower exterior. These are represented by single layers of card with
a vertical embrasure cut out; I did not want to risk cutting into
the foamcore at this point to make a full opening.
Any
small gaps in the card detail and balsa were filled with greenstuff
and Polyfilla.
| Step 6: Adding
texture to the
Mountainside |
Once all the
carving has been completed, Polyfilla was used to cover some
sections of the mountain, particularly where any straight lines were
visible. The process was repeated where necessary to improve the
appearance, and then a full coat of Fine Crack Polyfilla (basically
a thick paint-like liquid) was applied over all the exposed rock to
give it more texture. More Polyfilla was applied to any point where
straight lines were visible, and extra coats of Fine Crack Polyfilla
were applied as and where necessary. More texture could be added
using a small amount of fine sand mixed with the filler. Be careful
not to cover up any of the detail already carved into the polyfoam.
The image below is of an early stage in the texturing process; this
took days as the filler must set completely before applying more
over the earlier layer(s).
| Step 7: Building
the Crown of Durins
Tower |
The damage to the top
of the Endless Stair includes the wall and ribs of the tower, and
the internal supports for the platform. Damage was created using a
modelling knife.
There
is a step up from the main platform floor to the window on the
crown of the tower. Another 140mm circle of foamcore is drawn with
the radial lines drawn at 30 degree intervals this is used as a
construction guide for correct placement of the vertical sections of
each window arch. A 110mm circle sharing the same centre was drawn
within the 140mm one, and the points where the radial lines
intersected this 110mm circle were joined up to form a 12-sided
polygon, This was cut from the centre of the disc. This ring was dry
fitted to the top of the tower as shown below.
Damage
matching up with that at the top of the Endless Stair was made to
this step ring before gluing it in place. I am repeating one of the
earlier diagrams here as it shows the placement of the pillars and
arches around the crown of the tower.
The
vertical centreline of each pillar will align with the horizontal
radial line drawn on the platform and step. Some of the pillars are
mere stumps, others are longer stumps and there are only 4 windows
remaining intact out of the original 12 (wrecked during the Battle
of the Peak). The complete uprights are made from 12.5mm square
section balsa, cut 45mm long. A section 15mm long by 7.5mm deep is
removed from the bottom inner edge of all the uprights (intact or
damaged). The effect can be seen clearly in the next image on the
damaged upright immediately to the left of the Minas Tirith archer.
Seven complete uprights plus a long, medium and two short stumps are
required altogether.
The
upper part of the windows was really tricky to make. Cut the
rectangular section balsa down to 12mm x 8mm size. Cut lengths of
25mm from this 8 are required to make the 4 complete window
arches. The problem is that the two halves of each arch run parallel
to the pillar they come from, so the midpoint is actually further
from the centre of the tower. I gave up trying to draw accurate
plans for these and created them by seat of the pants cutting and
trimming with frequent dry-fitting. Any flaws could be covered by
the battle-damage clause and also with snow and ice. The next
composite image shows these windows
The
tapering of these arches was done similarly to that of the main
sections described earlier though the inner-to-outer part is not
used. Thicker card is cut to form the first layer of the arch
decoration. At this point I realised that I had not taken WIP
pictures of the latter stages of fabricating the crown so the next
couple of images will be used for reference.
More
layers of card are added to the circumference to make another patter
similar to that found on the section transitions on the lower part
of the tower. A total of three layers were used here. Any gaps in
the card were filled with Polyfilla.
The window arches were
finished with short sections of foamcore, cut to fit inside each
arch and then cut to make a central gully. This was deepened using a
single layer of thin card. The gully is radial and central to each
arch. A segment of this sculpted foamcore is outlined in the diagram
below, as it the arch and the simple cornice detail. Repeat this
process all around the crown (12 sections).
More
Polyfilla and Thin Crack Polyfilla are used to seal the edges of the
Endless Stair and the damaged platform and walls. Allow some to
accumulate in corners as it can be used to bulk out accumulations of
snow later on.
The
same applies to the damaged lower section of the tower, where some
polyfoam off cut was used to help create the blasted wall of the
tower.
| Step 8: Painting
the Rocks of Durins Tower and
Zirakzigil |
Do not laugh I
started painting the mountain before I had finished the tower
itself. The opening sequence of The Two Towers had shown the Misty
Mountains to have some percentage of rust red coloured Sandstone, so
I wanted to have reds and browns as well as greys in the blend of
colours and tones for Zirakzigil. Durins Tower is carved and built
from the same material so it would have the same basic colour
scheme.
I use DecoArt acrylics for large terrain pieces as
they are much cheaper than the Games Workshop or similar
equivalents. The base coat is Black mixed with varying percentages
of Burnt Umber. It is very important to fill in all the nooks and
crannies in the rocks, as well as on the tower.
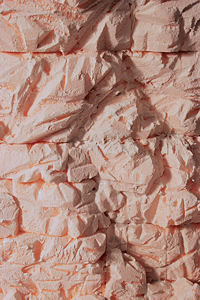
Once the
base coat was thoroughly dried, I started with a heavy drybrush and
stipple of less Black, varying amounts of Burnt Umber, Tan and
White. I created some stratification, as would be seen in
sedimentary rocks, just through use of colour.
Another
drybrushing, with paler mixes of the colours above was used to bring
out the texture and detail of the rock.
The
drybrushing process continued until I was satisfied that there was a
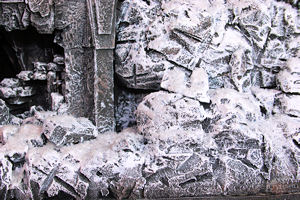
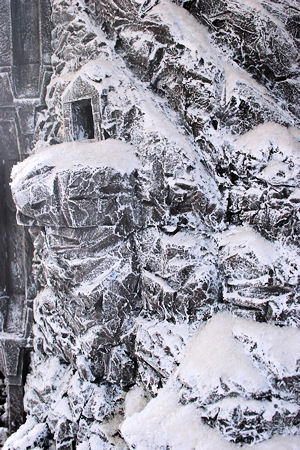
decent base for the frost, ice and snow. This detail from the
mountain gives an idea of the textures and variation in shades
present.
Once
the tower construction was complete, it was coated in the Fine Crack
Polyfilla and allowed to dry before being base-coated and
dry-brushed in the same manner as the mountain.
| Step 9: Creating
the Snow and Ice |
I wanted
the snow to be really brilliant white, and for that to happen you
need a base coating of white. The other requirement was to represent
the fine clinging ice and frost as well as spindrift that gets into
all the fine cracks and little ledges on a mountain. So I had to
paint on the first layer of snow, all over the tower and mountain.
Snow falls down, but also gets blown sideways in windy conditions.
Apply a drybrush of DecoArt white, looking at each section of
terrain and orienting the brush for the most effective coverage and
appearance. I found it best to work over the surface in a series of
repeated coatings, standing back occasionally as that helps spot
areas than have been missed or have insufficient coverage. The
object is to suggest ice, frost and fine snow and not to cover every
available surface. The top of the mountain, the platform and some of
the flatter ledges would naturally have deeper snow cover so these
areas have a more complete coating of white.
Allow
the paint to dry before starting on the artificial snow itself. You
will need a very clean working area, one that can be vacuum-cleaned
and wiped down thoroughly afterwards, as the fine powder gets
everywhere no matter how careful you are. I tried some of
Antenocitis snow first, applying Deluxe Scenic Bond to some rocks
around the base of the tower as a trial area (I had never used
artificial snow before). The result was slightly disappointing, as
shown below.
However
I persisted, using the Antenociti material to make up a base layer
where thicker areas of snow lay on the rocks. I allowed 24 hours
between each coating so the glue would be thoroughly dry. Another
tip is to get large sheets of white paper and use that as a catcher
for fake snow that falls off the mini; you need to shake off the
excess after the glue has set, and I actually vacuum-cleaned (very
carefully!) to get loose material out of any nooks and crannies.
The top layer of snow, and the final coverage overall, is
made from Deluxe Scenic Snow. This is a very fine powdery snow,
brilliant white and perfect for 28mm scale. I used both ScatterGrip
glue (very tacky but can dry to a pale blue colour) and the Scenic
Bond to hold this in place. The technique I used was to take a
section of the model, dab on glue to all the places where snow is
required, and then shake material down from the applicator bottle at
a height of 250 300mm. Let this sit for a few hours and then
carefully shake the excess off the model onto the paper, and put the
saved snow back in the bottle for the next application of snow. It
can be a bit tedious, but the results are worth it and I was working
on an unusually large terrain piece.
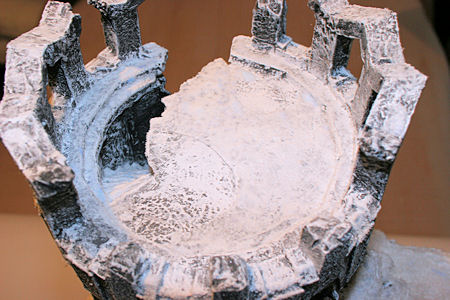
The
crown of Durins Tower is always exposed to the wind, from whatever
direction, so there would not be any deep drifts present, just a
good layer on the platform and a comprehensive coating of ice, frost
and clumps of snow on the arches. There would also be snow on the
exposed section of the Endless Stair. I applied no snow to the
positions to be occupied by Gandalf and the Balrog that snow would
be on their individual bases as I wanted the minis removable for
storage or display. The snow on the rest of the platform was built
up of successive applications.
One
advantage of pouring the snow on the mini is that you can see
realistic accumulations occurring naturally and used that on the
next cycle of application by adding more glue at those points.
I
stopped applying snow more or less when I ran out of it, and the
Awards deadline was getting very close, otherwise I would have put
some more on (and might yet!)
| Step 10: Converting
and Assembling the Balrog |
I
wanted to give the balrogs wings the ruined, skeletal feeling
apparent in the Battle of the Peak scenes. It takes a considerable
amount of time to cut away the bulk of the wing membranes due to
their size, and this should be done before assembling the Balrog. I
used a pin vice to drill lots of holes in the surface of the wings,
widening some of them with a hobby knife, and then cutting into the
wing using side-cutters. The bulk of each membrane was removed in
chunks of around 1 square centimetre, and then files and a hobby
knife were used to neaten the rest. The ribs (or fingers) of each
wing are left intact, and I left a few shreds of wing membrane in
place for both visual effect and to add a little support.
The
left wing was heated gently to allow slight bending of the pinions
to indicate more battle damage. I was not able to take this quite as
far as I originally planned as small stress fractures appeared in
the plastic.
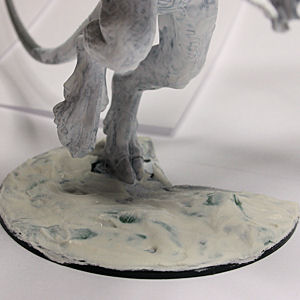
The right foot of the plastic Balrog is resting
on Moria rubble; this was removed carefully, using side-cutters,
hobby knife and needle files.
The
Moria bas was discarded as I wanted a flat base for the platform
area. A section of this was removed to fit around the shape of the
top of the Endless Stair. The plastic Balrog was assembled using
polystyrene cement. A small amount of green stuff was used to beef
up the mane of flames and fill in join lines. The excess greenstuff
was used to add some bulk and texture to the base, and Polyfilla was
used to increase this depth. Some pits and scrapes were made in the
surface of the Polyfilla when it was about half set, to represent
the to and fro of the Balrog during the battle. The Balrog is still
stable enough to stand on this trimmed base.
The weapon was
cut carefully from the balrogs right hand as it was not shown
wielding either sword or whip in the film
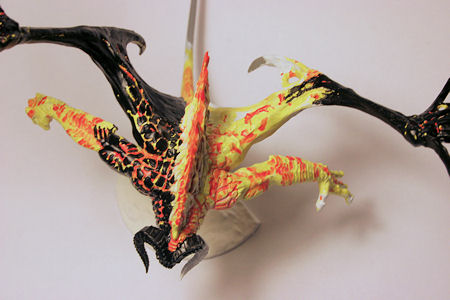
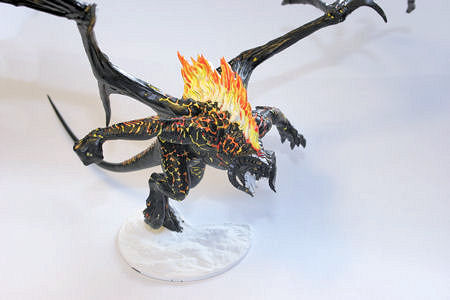
| Step 11: Painting
the Balrog |
Frankly I would
thoroughly recommend following Durinsbanes fantastic guide on how
to, err, paint himself, as it were... . My humble
attempt is similar in that it starts with a Skull White base coat,
followed by yellows, then blends of orange and a little red though I
used watered paints rather than inks. Bear in mind that colour
indicates temperature, so the core and upper parts of the Balrog
will be hottest and therefore white-hot; the extremities will be
cooler, as will the outer edge of the mane, shading through yellow,
orange and into red.
This Balrog is wounded from the long,
terrible fight against Gandalf, who was equipped with Glamdring, one
of the powerful magic swords from Gondolin, and one of the very few
weapons capable of damaging the demons of the ancient world. This
Balrog would have more of the flaming, molten interior visible on
the arms legs and wings, indicating places where Glamdring and
Gandalfs powers had struck again and again.
Chaos
Black is applied to the scales and raised areas of the skin for a
lava crust appearance. Use a fine brush. An advantage to working
with the plastic Balrog is that its relative lightness means you can
hold it at any angle to get at all the awkward corners.
Lava
is not just plain, uniform black, and there was texture and detail
visible on the darker portions of the Balrog in the film so I used
several greys applied as dry brushes to scales and musculature, as
well as to the horns.
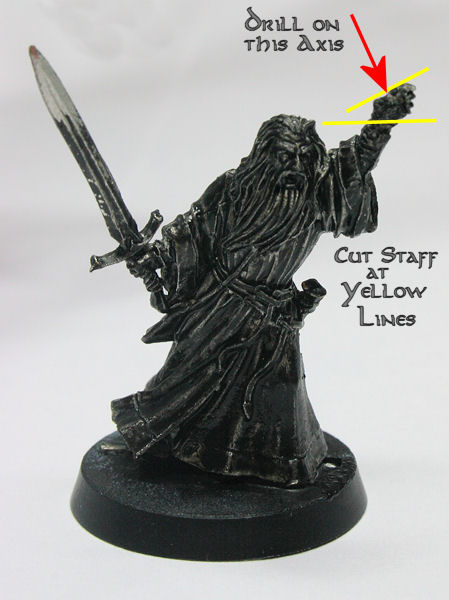
| Step 12: Converting
Gandalf |
The concept is
simple remove the wooden staff completely from Gandalfs left
hand. Use side cutters, or fine hacksaw, to cut carefully along the
indicated yellow lines as near as possible to the left hand without
damaging it.
Use
a very fine bit in the needle-vice/twist drill to drill through the
remaining piece of staff in the left hand. Use the drill to ream out
the hole so that the hand becomes empty. Use the sharp tip of the
needle cutters to remove most of the remaining metal from below
Gandalfs thumb and between the thumb and fingers. Tidy the hand up
using the drill bit and needle files. I bent the fingers in
slightly.
| Step 13: Painting
Gandalf |
The paint scheme is
basically Gandalf the Grey minus cloak and the famous Blue Pointy
Hat. There are Games Workshop guides and MacGothmogs excellent
article in the One-Ring library - http://www.one-ring.co.uk/phpBB2/kb.php?mode=article&k=554
so you can choose from a variety of styles and approaches. I am
afraid that I tend to fiddle about with figure painting so there is
no uniform strategy followed throughout (I make it up as I go along,
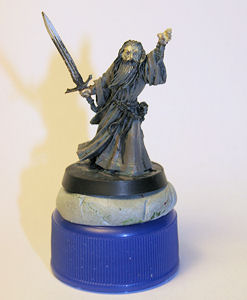
mostly). I blutack the mini to a plastic bottle top as this makes it
easy to hold and avoids damaging the paint while you work on it.
I
started with a Chaos Black basecoat. Gandalfs attire was weather
stained, and singed from the prolonged fight with the Balrog, so I
added some brown to the various shades of grey applied in stages,
starting with the darkest and working through drybrushing (I am not
as advanced at the blending concept) to lighter shades on the
outermost folds. The face was painted overall Dwarf flesh, then
thinned Scorched Brown was used as an inking medium, and the eyes
were just suggested rather than spending a lot of time trying to get
narrowed scowling eyes (you are welcome to try!). Gandalfs eyebrows
were dark at this time. The beard is not uniform looking at photos
of Ian McKellen in full makeup shows paler and darker areas on the
strands of the beard as well as some brownish grey areas either side
of the central strand. I tried to capture this with a variety of
greys, browns and detailed drybrushing. I also wanted the beard to
be distinct from the clothing too many greys!
I
am contemplating some tweaks to this mini as I am not 100% satisfied
with the painting (the joys of not having enough time!)
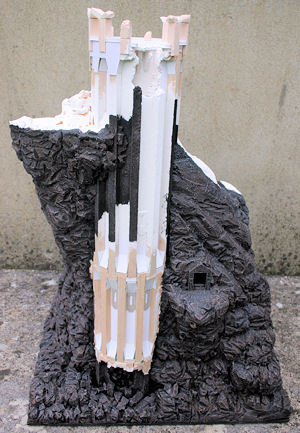
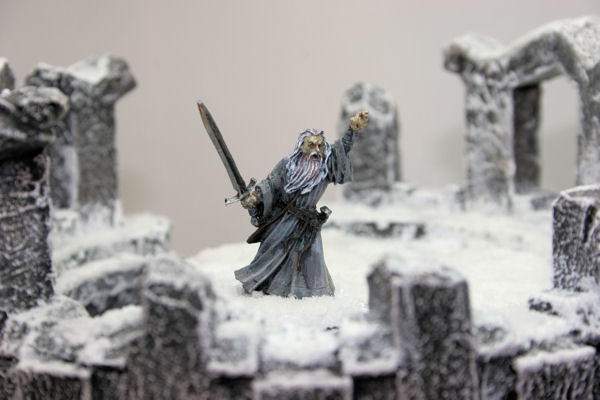
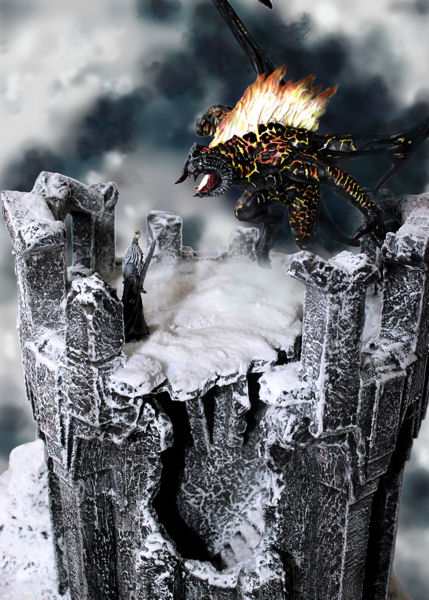
Here are a few
images of the finished piece. A pity I could not arrange for clouds
of black smoke and some lightning...
Smoke,
clouds...
| Musings and
Afterthoughts |
I was
contemplating calling this A Meeting of Olde Fiends but not
everyone would have understood (or appreciated) the satirical twist
(Gandalf and the Balrog are both Maiar, demigods of Middle-earth).
Would I do anything differently second time around? Yes it would
be bigger (no, not joking), and the tower detail would be even more
accurate as I found more images after I had this piece finished. I
would also try to improve the level of flame detail on the balrogs
mane the metal version is clearly superior. A pity the Games
Workshop Balrog is too small really. Ah well.... And whatever I
build in future, it will be in more numerous, smaller stages so that
the corresponding articles will not be as long as this one! |
| |
|